How to use the Section Dashboard
If your section was created from a single Learning Product, the section title will display in a blue bar. If the section was created from a Certification product which includes one or more individual learning products, the main certification product's section title will display in a blue bar at the top and the section for each indidivual learning product will display in a yellow bar below.
 button will take you to the Learning Product detail page or Certification Product detail page for that Section. The content on this page can be customized on the product Description tab. You can copy the URL from this page and provide it to learners so that they can enroll themselves in or purchase access to this specific section of the product.
If you need to allow learners to be automatically enrolled in a learning product for free, use the  button.
- Next to the Enrollment Link, click the
 button to copy the link to your clipboard.
 - You can add this link to a site page, or distrubute it to learners. When a learner clicks on the link, they will immediately receive an enrollment in the product and will be taken directly to the enrollment.
Note that the learner can only use the Auto Enroll link if the product is set to "Free" in their rate category.
Note that this link is not protected and should not be used when you want to control who can enroll in the product.
 button takes you to the Enrollment Detail Report. The section admin can run the report on only the learners in that particular section.
Please return after **time** **time zone** on **date**
- Click Create to create a new class.
- Click in the Time field, select the date, hour and minute and click
 .
.
- Select the class Timezone.
- Enter the Address of the event including City, Country, State and Postal Code.
- Click in the Instructors Name field and select an instructor from the drop-down list. You can also begin typing a name to locate the instructor. Multiple instructors can be added, and instructors can be removed by clicking the X next to the name.
- An Attendance Code will be generated automatically, though you can click
 to change it or enter your own and click
  to be sure it is unique.
- Fill in the Attendance Code Expiration date and time. At the time selected, the code will no longer be redeemable by learners.
- Optionally enter Learner Notes. These notes will display to the learner when they launch the Classroom activity in the learning product.
- Click
 .
.
- The Section Dashboard will display the time, location, attendance code, and code expiration date and time.
- To make changes to the Classroom, click Edit next to the Learning Activity Title in the table on the Section Dashboard.
Note: Learner Community is currently integrated with Cisco WebEx, and only supports Meeting Center (not Event Center, Support Center or Training Center).
If the product includes one or more Webinar activities, the Webinars table will be visible on the Section Dashboard.
- Click on Schedule to schedule the webinar.
- The product Lesson, Activity and Timezone will be displayed.
- Enter the webinar Start Date by clicking on the
 button and Start Time by clicking on the
  button, or just type in the date and time.
- Enter the webinar End Time by clicking on the button or just typing in the time.
- An Attendance Code will be automatically generated, but you can change it to any code you wish to use as long as it is unique (if the code is already being used, you will not be able to save).
- Click to schedule the webinar, or
 to remove the webinar date and time.
- The date and time and attendance code will be displayed on the Section Dashboard.
- At the webinar start date and time, click the Launch button to start the webinar. The learners who are enrolled in the section will be able to launch the activity and view the webinar until the admin ends the meeting.
- To edit your webinar date/time/code, click the Edit button next to the Activity Title in the Customizable Content table.
Note that if you do not use Cisco WebEx Meeting Center, you can still link to a webinar by using an HTML activity. You will not be able to launch or track the webinar directly from Learner Community, but this will give your learners access to the webinar.
If the product includes one or more Proctored Assessment activities, the Proctored Assessments table will be visible on the Section Dashboard.
Proctored assessments are used to provide an assessment or exam in person. The learner is tested offline in a classroom setting; a proctor should be present to distrubute and monitor the exam. Learners will turn in their completed exam to be graded and the section admin can then enter the score to complete the learner's activity.
You can create multiple "versions" of a Proctored Assessment that can be printed and distributed to learners. Each version will be unique with test questions randomized, though it will use the number of questions and required questions specified in the assessment. You can also print out the Answer Key.
- Click on Manage in the Proctored Assessments table, next to the Activity Title.
- Click
 next to the version that you want to use to print out a copy of the assessment.
- Click
 to print out an answer key for the assessment version.
- If you need to create a new version of the assessment, click on Generate New Proctored Assessment Version and give it a Name.
Any activities that have been set to "Can be Customized" or "Must be Customized" will show up in the Customizable Content table on the Section Dashboard.
- Click the Edit button next to the Activity Title.
- Make any necessary changes to the HTML content and click . Click the button to reset the content back to the original activity content.
- If it is a Webinar activity, schedule the webinar date and time.
- When an activity has been customized, the
 icon will appear in the Customized column.
See below for more information about Facilitated Activities:
Some learning activities let you allow or require the section administrator to customize content. This property is set when adding or editing the activty in the Product. You can choose one of the customizable options in the dropdown box:
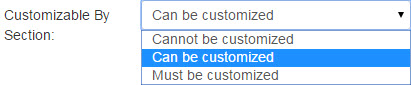
- If you select Cannot be customized the section admin will not see the activity in the list of customizable content.
- If you select Can be customized, the section admin will have the option to customize the content if desired.
- If you select Must be customized the section admin has to edit the content before any learners in the section can launch the activity. If a learner tries to launch the activty before it is customized they will receive the following warning:

All activites that can or must be customized will show up in the Customizable Content table on the Section Dashboard. Activites that must be customized will include a  icon and activities that have been customized will include a icon.
The following activty types have the Customizable by Section option:
- Content HTML
- Discussion: customizes the Directions to Learner
- Dropbox: customizes the Learner Instructions
When an activity is pending review by an administrator, the admin will receive a notification with a link to review. If the admin does not view and address the notification on the portal, the notification will be sent to the admin in the daily Notification Digest email. The admin can also grade activites on the Section Roster tab under the Required Grading table.
- Discussion: Scoring is only required if the learning activity property "Requires Section Administrator to Score Posts" has been selected. The section admin can review the learner's posts, confirm that the activty has been completed and submit a % Score.
- Dropbox: Scoring is always required in this type of activity. Dropbox activities cannot be used without a section admin to mark the activty complete and enter a % Score. The admin can review the uploaded file, leave a comment for the learner and include an uploaded attachment.
- Proctored Assessment: Scoring is always required in this type of activity. Proctored Assessment activities cannot be used without a section admin to choose the assessment version and enter the Total Points Achived.
- Live Classroom: If the learning product includes a Live Classroom activity, it will be listed on the Section Dashboard in the Classrooms table. The admin can click Create to enter the live event date, time, location and instructors as well as generate an attendance code to the learners to redeem after attending. If a learner tries to launch the activity before the admin has scheduled the event, the following warning will display:

- Webinar: If the learning product includes a Webinar activity, it will be listed on the Section Dashboard in the Webinars table as well as in the Customizable Content table. The admin can click Schedule to enter the webinar start and end date and time and generate an attendance code that can be redeemed by learners if they do not launch the activity during the webinar time.
After the webinar is scheduled the admin can Launch the webinar from the Section Dashboard during the time it is scheduled. The webinar can be Edited from the Customizable Content table.
If a learner tries to launch the activity before the admin has scheduled the webinar, the following warning will display:
The top of every page in the Section Dashboard includes two buttons for section admins to review the product content.
- Click the
 button to review the product content. The section admin will see the product in the end-user view and be able to launch each acitivty, though will not be able to submit assessments. This functionality is for review purposes only and will not create an enrollment for the admin.
- Click the
 button to reset the content review to remove any activity completions.
The top of every page in the Section Dashboard includes a button to create an exacty copy of a section for a particular product. This lets you create multiple sections for a product without having to go to the main sections page. It also lets you retain section settings so that you don't have to recreate sections that will have the same or similar settings.
- Click the
 button to create a new section with the same configuration as the current section. Enter a title for the new section and optionally add an Intergration Product Code. You will be taken to the Section Dashboard for the new section.
- The new section will start with the current section's lock date, time zone, name, capacity, any existing activity customization, administrators, and catalog enrollment settings. These can all be edited in the copied section.