Every Learning Product will need to have properties set that control how your learners, administrators and internal management system interact with the Learning Product. After creating a Learning Product or clicking the Edit link from the Learning Products dashboard, you’ll be automatically directed to the Configuration tab.
Click on the highlighted text next to each of the following fields to continue your configuration. Choose an option using the dropdown box if available or fill in the value and click the  button to save or the
 ![]() to clear your selection.
to clear your selection.
Not all fields are required in order to create a Learning Product. Some options will require an additional entry if selected.
- Title: Learning Product titles can contain up to 100 characters—letters, numbers, and/or symbols. (required)
- Category: Choose the category that best describes this learning product. The list of available categories is determined by your organization during initial implementation. Contact your project manager or the support team if the list needs to change. There is a 20 character limit. (required)
- Categories are 1 or 2 word learning product descriptions. They are frequently used to describe the delivery method of the product.
Examples: Online, Instructor led, Webinars, etc.
- Default Term Days: Enter the number of days that a learner will be enrolled in the Learning Product--the enrollments will expire after the number of days you specify in this field. The enrollment term days will be indicated when a learner enrolls in a Learning Product.
- If you leave the field set to the default of None, the learning product will never expire and learners who have enrollments will keep their active enrollments indefinitely.
- If you entered Default Term Days, you will need to select the trigger event upon which the Term Days will begin counting down. You can select When enrollment is first viewed to start the countdown as soon as the learner accesses the learning product, or When enrollment is created to start the countdown as soon as the learner enrolls.
*Note: The Default Term Days set in an enrollment code that includes this product will override the days set in the product configuration.
- Maximum Enrollment Active Thru Date: If learner enrollments will all need to expire on a set date, change the default None to a specific date on the calendar. This is useful if your learning product credit expires on a certain date or if the content will no longer be valid after a certain date.
- If you have both Default Term Days and a Maximum Enrollment Active Thru Date, the Maximum date will override the term days if they overlap.
- Example: A learning product has 60 term days, but is set with a max enrollment date of 12/31. If the the term days start less than 60 days before 12/31, the enrollment will still expire on 12/31 regardless of the amount of term days remaining.
- The learning product will expire at 11:59pm (the learner's local time zone) on the Max Thru Date.
- Note that if you update the Max Thru Date and republish the learning product, only new enrollments will use the new date. Existing enrollments will still be set to expire on the original thru date and can be extended individually if needed.
- If you have both Default Term Days and a Maximum Enrollment Active Thru Date, the Maximum date will override the term days if they overlap.
- Assignable by Admin Types: If you will be including the learning product in any assignments, select the level(s) of administrator who can create assignments for the Learning Product. If “None” is selected, no one will be able to assign the Learning Product.
- Integration Product Code: This is the unique code / Course ID that your management system uses to identify the Learning Product if Learner Community is integrated into your organization's internal management system.
- Integration Completion Code: If an external system needs to write a transcript, this code will notify the external system. This feature is not required by most LearnerCommunity clients.
- Completion Valid For: If completions in the learning product will need to expire or will be invalid after a certain amount of time, enter the number of days for which the completion is valid. This expiration date will display on the learner's transcript.
- Uses Learning Activity Thumbnails: Set this property to Yes if you want to configure the learning product activtiy page to use thumbnail images in the in-template view to represent each activity. This creates a more graphical and engaging learner experience. After setting this property, you will need to upload an image in each learning activity that you add to the learning product on the Lesson Structure tab.
- Allow Re-enrollment After Completion: You can control your learners' access to enrolling in learning products that they have already completed.
- If you want to require the learner to wait before being able to re-enroll, select Yes, after a specified number of days from the dropdown list and then enter the number of days.
- If you want to let your learners re-enroll anytime, select Yes, immediately.
- If your learners will not be allowed to re-enroll at any time, select No.
- Allow Re-enrollment After Failing Requirements: You can control your learners' access to enrolling in learning products that they have failed.
- If you want to require the learner to wait before being able to re-enroll, select Yes, after a specified number of days from the dropdown list and then enter the number of days.
- If you want to let your learners re-enroll anytime, select Yes, immediately.
- If your learners will not be allowed to re-enroll at any time, select No.
- Product Detail Page: Whether accessed from a catalog page or a direct link, the Product Detail Page can give your learners details about the product before they enroll. You can control how or if your learners will be able to view this page. Please see Learning Products - Description for more information.
- To allow access to the Product Detail Page, select Public - Anyone With The Link from the dropdown list. You can keep the page public Forever, or you can select a From and/or Thru date. The Product Detail Page will not be accessible outside any specified date window. If you want to include details about Credit Profiles in your learning product description, select Yes next to Show Credit Information.
- To prevent anyone from accessing the Product Detail Page in any way, select Disabled - Nobody May Access from the dropdown list. This will immediately hide the Show in Catalog option.
- Examples:
- You may choose include direct links to a Product Detail Page on one of your site pages or in an email and not use a catalog. This can be useful if you want to provide enrollment access into a particular Section.
- You may choose to disable to Product Detail Page entirely and only allow enrollments through enrollment codes or a batch upload process.
*Note: Product Detail Pages can be Public even when the product is not shown in the catalog. Keep in mind that anyone can access a public page as long as they know the correct URL.
- Show in Catalog: If the learning product can be included on a catalog page (any page containing a Catalog Widget), select Yes. You can allow the product to be included in a catalog Forever, or you can select a From and/or Thru date. The learning product will not be shown in any catalog outside the specified date window. Select No if you do not want the learning product to be included in any catalog page.
- Priority Number lets you control the order in which the product is displayed on any catalog page. The lowest numbers have the highest priority and will show at the top of the list.
*Note: To use the Priority Number, you must enable the Catalog Priority in each Catalog Widget that will include the learning product.
- Enable Section Enrollment Options: This property lets you configure your learning product to display as a list of sections in catalogs and on the product detail page. The list is dynamically populated using start and end dates specified on each section. You can control which sections are displayed to the learner and the section title to be displayed. Your learners are able to enroll in specific sections, or add them to their cart.
- To enable sections, go to Products>Sections and Manage each section for the product. Go to the section Configuration Tab to enable the enrollment options.
- Rate Categories: Your portal will have specific rate categories set depending on your needs. Some portals have a single reate category listed as Your Cost, while others may have Member and Non-Member rate categories. Work with your project manager during implementation to set the appropiate rate categories, or contact support if any changes are needed.
- If the Rate Category is set to Not Available, it will not be possible to enroll in the product through a catalog.
- If the Rate Category is set to Free, there will be no charge for enrolling in the product through a catalog.
- To set pricing, choose Cost and then enter the dollar amount.
Options
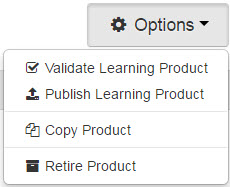
- Validate Learning Product: To check your learning product to be sure it is ready to publish, choose the Validate Learning Product Option from the drop down list. You will see a list of Errors and/or Warnings letting you know about any issues that will prevent your learning product from being published, or possible missing elements that you may want to include in your learning product.
- Warnings are only meant to inform you of items that you may want to include, but that are not required.
- Publish Learning Product: The Publish Learning Product option lets you publish your learning product to your live portal. You can also publish products on the Learning Products Dashboard.
*Note: It is important that you review the product to ensure that it is ready for use by the public. Other than to correct spelling errors, republishing should be avoided. ALWAYS validate your learning product before publishing.
Structure: If your structure has changed, Enrollments and Completions will be maintained but all enrollment progress may be lost. If evaluation or assessment questions and/or choices have been changed, this will affect reporting on those items if Learners have already submitted responses.
Completion Criteria: If the completion criteria changed it will not affect existing completions. However, changes could cause new completions to be recorded automatically.
Credit Profile: If a Credit Profile has been set to expire, Learners will no longer be able to claim the credit after the expiration date of the credit profile. New credit profiles may become eligible for Learners that have already met the credit profile criteria.
- Copy Product: To make an exact replica of the learning product, choose the Copy Product option from the drop down list. This will create a brand new product with identical settings to the current product, including configuration, activities and settings, structure, certificate, etc. Integration Product and Completion codes will not copy. You can modify the copy as necessary.
- Retire Product: If the learning product is no longer valid or needs to be removed, choose the Retire Product option from the drop down list. Retiring a learning product will remove all existing enrollments on both staging and LIVE, and will prevent any new enrollments from occurring. Retired products will still be available for reporting on staging and LIVE.
- At this time, it is not possible for you to "un-retire" a learning product. This will need to be sent as a request to our IS department.
- When a learning product is retired, it will NOT be visible in the following locations:
- New Bundle (assignments area)
- Manage Single Enrollment Code (New/Edit)
- Add Learning Product
- Manage Enrollment Codes (New/Edit)
- Add Learning Product
- Subsidiary Enrollment Code
- Add Learning Product
- Manage Learning Product
- Not Published
- Published
- Badge Add Rule
- Edit badge (3rd option on add role)
- Subsidiary Portals
- Add Learning Product
- New Enrollment Code Bundle
- Marketplace > Licensed Products (like Deleted UTC)
- All tabs, all grids
- Export Clients
- New Export
- Subscriptions
- Add Learning Products (selection grid)
- Certifications > (display "Retired Product", like deleted)
- Add Learning Products
- Assignments
- Add Learning Product
- When a learning product is retired, it will be visible in the following locations ("retired" will be noted next the product title):
- Reports
- Enrollment Detail - Not displaying retired products
- Enrollment Progress Summary - Section Picker
- Enrollment Summary
- Assessment Summary
- Assignments > Assignment Detail > Assignment option > not displaying assignment with retired LP
- Manage Single Enrollment Code (New/Edit)
- Selected Learning Product
- Manage Enrollment Codes (New/Edit)
- Selected Learning Product
- Manage Learning Product
- Retired
- All
- Subscriptions
- Selected Learning Product
- Export Clients
- Edit Products
- Subsidiary Portals
- Selected Learning Products
- Selected Enrollment Code Bundles
- Certifications > (display "Retired Product", like deleted)
- Learning Products Grid
- Learner > Manage Learner
- Enrollments (display "Retired Product" label)
- Marketplace
- Licensed Products > Your Products Licensed to Organizations grid
- Sections - Admins still need to be able to manage sections for retired products
- Assignments
- Selected Products
- Reports
Launch:
![]() As an administrator, it is important to be able to review your learning products as you assemble them and before publishing live. You have two options when reviewing on staging:
As an administrator, it is important to be able to review your learning products as you assemble them and before publishing live. You have two options when reviewing on staging:
- Normal Enrollment lets you see the learning product just as your learners will, with all gating and completion requirements intact.
- Ungated Review lets you access all activities without any gating or requirements. You are able to launch every activity without needing to complete anything first.
When reviewing an enrollment, you have some Administrative Options on Staging to assist with your review.
- Click the
 button to completely remove your enrollment in the learning product.
- Click the
 button to refresh your enrollment and remove any progress or completions.
