You can design your Learner Community web site by creating and editing Web Pages.
Each Web Page can be added to your overall site design and structure and will determine how learners view and access your site's content and layout.
Note that when you create a page, it is not automatically added to your navigation menu. The page will be available to add to your menu or to access through a direct link. See the Menu Configuration page for further details about adding a page to your menu.
Pages can be hidden or available during a certain window of time to allow you to control what your learners see and when.
There is no limit to the number of pages you can create and you can edit or hide them at any time. Changes to web pages will be seen on your Live site as soon as you publish the site.
The Web Pages tab displays a list of all existing web pages on your site and lets you edit and create pages.
- Search for a page using the Page Name.
- Click the Edit link to edit the page configuration.
- The Page Name, URL Path to the page, and page Language are displayed.
- If the page is configured with an active time window, the Active From and Thru dates are shown. If there are no dates shown, the page does not have an active time window set.
- Click the
 icon to delete the page.
- Click the
 button to create a new page.
- Clicking the Edit button next to a web page name will take you to Web Page Configuration. Here you can adjust the URL Name and Path, the Active From and Thru dates, and the authentication requirements.
- Click the button to add a new page.
- Set the Page Name
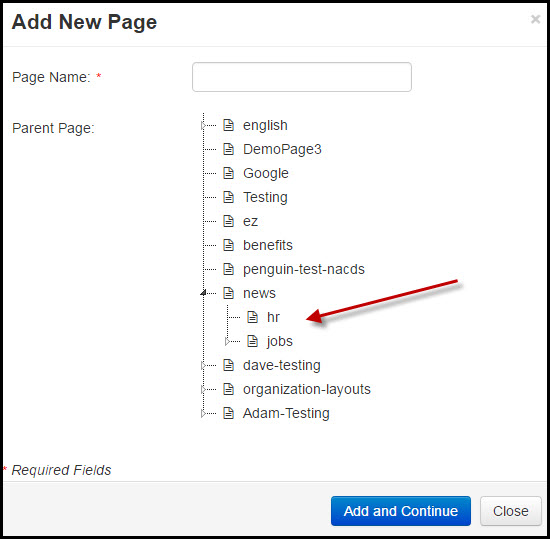
- If the page is a child to another page, select the Parent Page.
- Parent and child pages are useful in keeping pages in a folder-like structure. Each child page will include the parent page in the URL Path. In the example below, the "jobs" page URL Path will be "news/jobs".
- Click
 to go to the Web Pages Configuration page where you can set the properties and versions for your page.
- Site settings are changed in the Staging environment, so that your changes can be reviewed and tested before your learners see them.
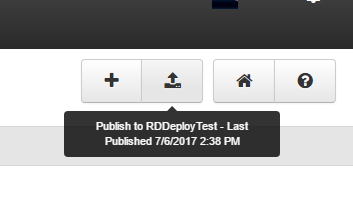
- Click
 when the changes you've made to your site are ready for your learners to see on the live site.
- Typically, publishing requests takes only a minute to complete, but can take a bit longer if there are other publishing requests ahead of yours, or if the publishing service has been intentionally paused for some reason (e.g., a new release of the Learner Community software is in progress). Contact your administrator if publishing still hasn't completed after 60 minutes.
- Note that after clicking the site will be locked for publishing until the publish request is complete. This typically only a minute or so. During the time the site is locked, some features will be disabled such as modifying a web page configuration. You will not be able to publish the site again until the request has completed. If someone attempts to publish while the site is locked, the following message will display:

- When publishing has completed, you can hover over the button to see the last published date.
- Note that Learning Products are published separately from the Site. Your site will need to be published the first time to create your live instance. Learning Products cannot be published until your site has been pushed live.