After clicking the Edit link for you menu, you can configure your menu by adding and deleting pages as well as arranging the order of the pages and creating dropdown lists.
- To add a page to your menu, click on
 and select Site Pages.
- Choose the page to add to your menu and click
 .
.
- You can edit the name of the page in your menu by clicking on the name in the Page Name box for the page's language. Click click on the name, make your change, and click the blue checkmark to save.
- Note that this only sets the name of the page as shown in the menu, but does not change the name of the actual page.
- To remove the page from the menu, click the
 button.
You can rearrange the pages in your menu by grabbing them and dragging and dropping into place.
To create a dropdown list under a page in your menu, grab the child page and drag and drop it over the parent page.
To add a Header Item, click and select Header Item.
and select Header Item.
- A header item is used to create a dropdown list in your menu, but the header item itself is not a clickable page.
- Enter the Header Item Text and click .
- The Header Item will display in your list of Menu pages. Drag and drop all of the pages in your menu that will need to be part of the Header Item's drop down list.
To add a menu item that links out to a web page outside of your portal, click . and select External Link.
and select External Link.- Enter the link text and the URL. Check the box if you want the external page to open in a new window or tab. Click .
- Site settings are changed in the Staging environment, so that your changes can be reviewed and tested before your learners see them.
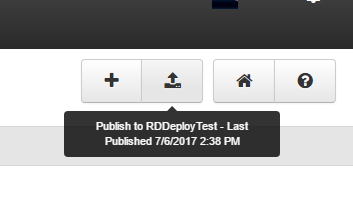
- Click
 when the changes you've made to your site are ready for your learners to see on the live site.
- Typically, publishing requests takes only a minute to complete, but can take a bit longer if there are other publishing requests ahead of yours, or if the publishing service has been intentionally paused for some reason (e.g., a new release of the Learner Community software is in progress). Contact your administrator if publishing still hasn't completed after 60 minutes.
- Note that after clicking the site will be locked for publishing until the publish request is complete. This typically only a minute or so. During the time the site is locked, some features will be disabled such as modifying a web page configuration. You will not be able to publish the site again until the request has completed. If someone attempts to publish while the site is locked, the following message will display:

- When publishing has completed, you can hover over the button to see the last published date.
- Note that Learning Products are published separately from the Site. Your site will need to be published the first time to create your live instance. Learning Products cannot be published until your site has been pushed live.